


Hello. Welcome to Glowing Green Stuff.
This is a blog done by a group of Molecular Biotechnology students from Nanyang Polytechnic.
The aim is to provide visitors with a deeper understanding about Green Fluorescent Protein (GFP), and also to share our experiences during the production of GFP.
Note: For the best viewing experience, pls switch to full screen mode (Internet Explorer users plese press F11). Thank you and enjoy =)
As we all know, Mother Nature has created many glowing marvels throughout history; Stars glitter high up in the sky at night, and one can never forget the scenic view when fireflies take to the air.

As Man saw these, they were smitten by the allure of the glow from the fireflies.
In 1960s, scientists began to study these glow, and the concept of chemiluminescence soon evolved. In 1976, Richard Van Zandt filed the patent for the glowing lightstick!

Nice right? Lightsticks' glow looks really nice! ^^ - Jocelyn Chan
However, not all scientists studied the fluorescence in organisms via the chemical perspective; some did it from the biological way.
In 1960, about the same time when other scientists were looking at fireflies, a determined scientist began to look at the bioluminescence of a jellyfish called Aequorea victoria...

...Want to know who is that scientist? Click on "History of GFP" on the menu
~~~~~~~~~~
Wondering what exactly is GFP? Click on "What is GFP" =D
Want to know more about our group and our fermentor? Click on "The Team!"
Want to read about what went on during our GFP production? Click on "Our Journal"
Interested in our snapshots we took during our practicals, click on "Photos!!"
To come back to this page at any time, simply refresh the page. =)

In 1960, Osamu Shimomura was interested on the theory behind the bioluminescence of Aequorea Victoria, a crystal jellyfish.

It was in the lab at the basement of his home where the study began. He found that the glow comes from very small light producing organs found on the rings of the jellyfish. Hence, these rings were cut off from the jellyfishes, and squeezed to obtain the 'juice' that contained the GFP.
Ewwww! - Yi Ying
Throughout his study, he failed in many attempts to isolate the GFP. However, he was undeterred and his efforts eventually paid off -
Osamu Shimomura finally isolated his sample of GFP from Aequorea Victoria. The isolated GFP can be seen in the bottle held by him(above)
Over a million specimens were used! But, it was well worth it; his study led to the GFP revolution, where the protein was further studied and developed. It was eventually used as tracer molecules, and became a tool in understanding many aspects in cell and animal biology.
As such, Osamu Shimomura was called "The grandfather of the GFP revolution."
His story was published in the Volume 217 of Journal of Microscopy.
To read it: Download it here! (PDF Format)
Wondering what exactly is GFP? Click on "What is GFP" on the menu right now! =D
So what exactly is GFP? As mentioned earlier, it stands for Green Fluorescent Protein. It is 238 amino acids (26.9kDa) long and forms a 11-strand ‘beta-barrel' conformation. There is also a single alpha-helical strand which holds the chromophore that runs through the center of the protein molecule.
To let have a better idea of how it looks like, here’s the structure of the GFP:
The GFP Amino Acid Sequence:
MSKGEELFTGVVPVLVELDGDVNGQKFSVSGEGEGDATYGKLTLNFICT TGKLPVPWPTLVTTFSYGVQCFSRYPDHMKQHDFFKSAMPEGYVQERTI FYKDDGNYKTRAEVKFEGDTLVNRIELKGIDFKEDGNILGHKMEYNYNS HNVYIMGDKPKNGIKVNFKIRHNIKDGSVQLADHYQQNTPIGDGPVLLP DNHYLSTQSALSKDPNEKRDHMILLEFVTAARITHGMDELYK

Because of its structure and its function, it is often called a “light in a can”.
The chromophore is the little red structure inside the greenish looking beta-barrel. This red structure is also commonly known as fluorophore (This is the reason why this protein will fluoresce!). This fluorophore is made up of three amino acids: Serine, Tyrosine and Glycine. Although this simple serine-tyrosinie-glycine motif is commonly found throughout nature, it does not generally result in fluorescent light.
In Aequorea victoria, GFP absorbs bioluminescent blue light from a photoprotein called Aequorin. This absorption of blue light, allows GFP to emit green fluorescent light.

So as you can see, GFP is as cool as lightstick! But if everyone wants to obtain this protein, Aequorea victoria could probably go extinct in no time (Not to mention about facing the wrath from a large group of animal activist)! However, with the advent of molecular biotechnology, production of GFP in the lab is possible! All we need is just a tiny bit of cells from Aequorea victoria =) It is quite a difficult task which requires the transformation of Escherichia coli cells.
Are you are curious about how it was produced in our lab?
Are you ready??..
..Here it is!

1. First, the cells from Aequorea Victoria were lysed to obtain their genomic DNA, which should contain a portion that encodes for GFP.
2. After the cells are lysed, the fragmented genomic DNA and pGLO plasmid vectors were cut using the same restriction enzyme.
3. In order to select the transformed cell at the later stage, pGLO vector contains two unique genes which codes for beta-lactamse and AraC.
4. Next, the fragments of genomic DNA were mixed with the plasmid vectors, in the hope that the particular gene sequence that encodes for
GFP will successfully ligate with a pGLO plasmid vector.
5. After the ligation step, the vectors were introduced into competent E. coli cells.
6. To isolate the transformed cells, the E. coli cells were grown on a Luria-Bertani agar plate with ampicilin and arabinose.
7. The colonies that grow on the plate should be bacteria cells which took up the plasmid vector (The vector contains beta-lactamase that can breakdown ampicilin).
8. In order to get E. coli cells that can produce GFP, the agar plate is placed under UV light to isolate fluorescing colonies.
(The arabinose that was added into the agar plate will “activate” the GFP gene.
9. Once the GFP-producing colonies were isolated, they are innoculated onto another agar plate (with same ingredients) to obtained pure cultures.
With the pure cultures of the transformed E. coli cells, large scale production of GFP is possible with the use of a fermentor! =D
That was the theory on how GFP could be produced. To look at what went on during our GFP Production in our lab, Click on "Our Journal"!
~~~~~~~~~
To know more about us and our fermentor, Click on "The Team!" now! =)
We're currently Year 2 students from Nanyang Polytechnic! Molecular Biotechnology Rules! (Yup we're Molecular Biotechnology students)

From left:
(Front Row) Yi Ting, Yi Ying, Jocelyn, Chin Boon
(Middle Row) Cheng Kong, Affendy, Teck Hui, Choon Kiat, Thow (Xin Qiang)
(Back Row) Alan, Wenyi, Andrew =)
And here's the star of the whole show!! Our beloved mini-fermentor!

To view the location of the parts, click on the above picture!

The acid, base and antifoam!
The acid and base are used to adjust the pH of the culture
Acid: H2SO4
Base: NaOH

One of the baffles in the fermentor
Baffles are used to introduce random mixing, preventing one way mixing which is inadequate.

Condenser
It is used to condense water vapor to prevent excessive loss of water.
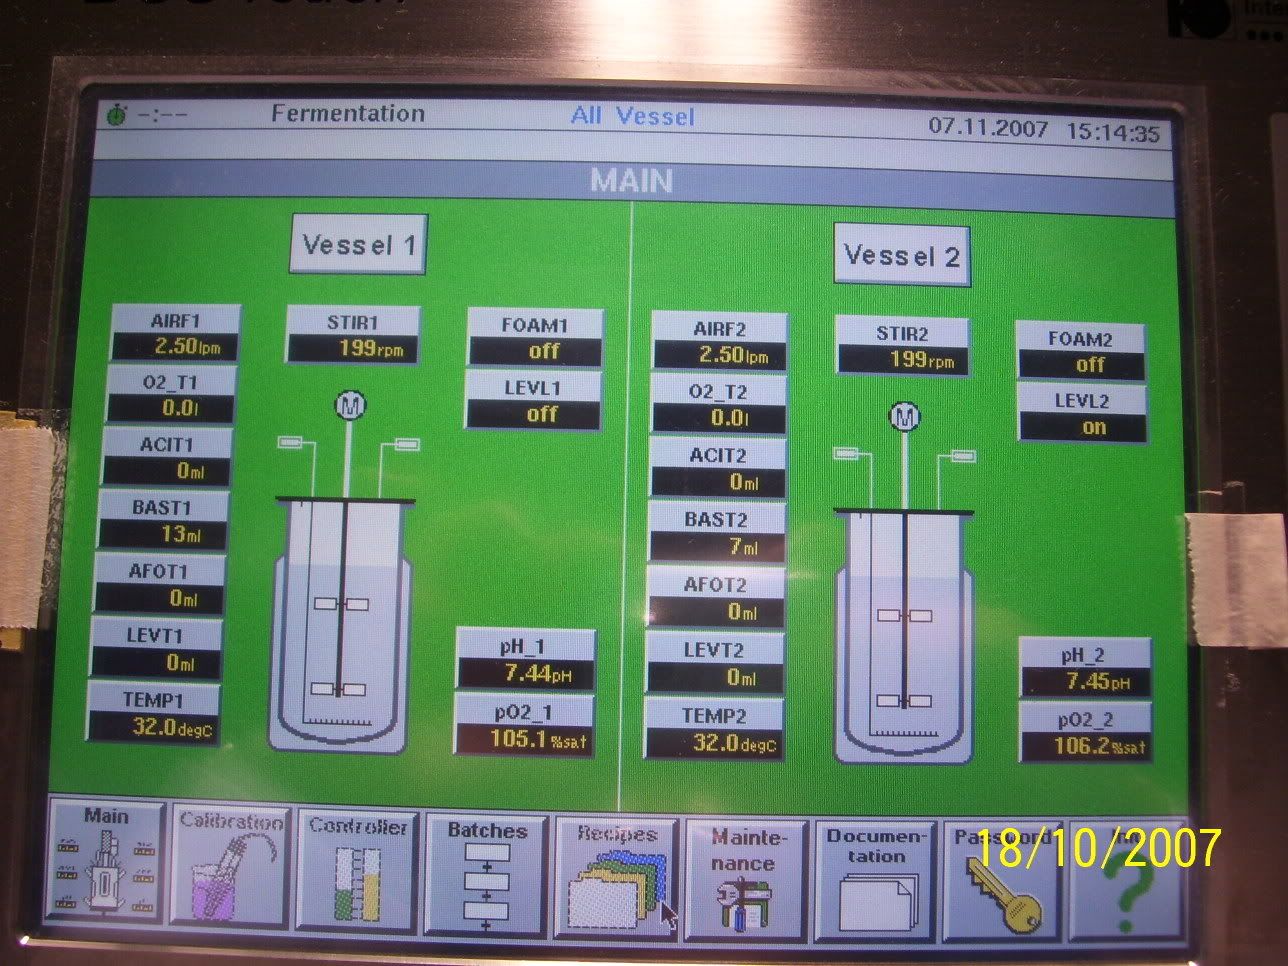
Control Panel: The brain of the fermentor!
It is used to adjust and maintain all parameters of the culture.

Cooling Jacket: The 'air-con' of the fermentor!
It is used to maintain optimum temperature of the media, it can warm or cool the culture to its desired condition.

Dissolved Oxygen Probe
It measures the amount of dissolved oxygen in the culture.

Exhaust Air filter
It is used to filter exhaust air to prevent air pollution. Although the exhaust air should be mostly carbon dioxide, the filter is generally present in culture fermentor to prevent any cases of toxic substance being released into the atmosphere.
Another important reason is to keep out contaminants from entering the fermentor via the exit.

Foam Probe
It detects the level of foaming in the culture

Impeller
The impeller stirs the culture

Inlet Air filter
It filters the air that is entering the fermentor

Motor
It is used to power the impeller

pH Probe
The pH probe is used to measure the pH of the culture in the fermentor

Pressure Gauge
It measures the pressure in the fermentor

Rotameter
It measures the flow rate of the air entering the fermentor

Sampling Tube
The sampling tube is used to draw samples out of the fermentor. Instead of drawing out the sample directly, this method minimizes chances of contamination

Sparger
The sparger introduces sterile air into the mixture

Temperature Probe
Is is used to measure the temperature of the media in the fermentor
The level probe (which is not used in this practical) is generally used to measure and maintain the level of the culture.
The day before..
Ooh our practical would be starting tomorrow! Before we begin we shall look at our objectives and procedures! I wonder what would it be like..
Its going to be complicated.. but i'm sure its definitely not going to be like this:

Haha! Ok now let us take a look at the objective and procedures!
Main objectives and Procedures
To produce and extract the green fluorescent protein (GFP) using Escherichia coli, which involve techniques of media preparation, preparing seed culture, inoculation of seed culture into fermentor, sampling, and isolation and purification of product GFP.
Experiment No. 1: Familiarisation with the Bioreactor and its Operation
Objectives
To familiarise students with the parts and components of microbial and mammalian bioreactor
To introduce the basic operation procedure of a bioreactor
Procedures
Media preparation
1. 50g of LB of pre-mixed LB powder was weighed on the weighing boat
2. 1L of milli-Q water and the 50g of LB pre-mixed LB powder were poured into the glass bottle. It was then placed on the stirrer plate for mixing.
3. Milli-Q water was then used to top up to 2L.
4. It was left on the stirrer plate for mixing.
Bioreactor preparation
1. pH electrode was calibrated using standard buffer solution (pH 7 and pH 4 or 9 depending on the culture)
2. pH probe, pO2 probe and foam probe was installed into the top plate Height for the foam and level probe was adjusted if necessary.
3. The addition agent lines for acid, base and antifoam were connected. The levels in the storage bottle were checked.
4. Other accessories such as exhaust condensers, air inlet and exhaust filters and manual sampler unit was installed. The water jacket is filled with water.
5. All cables except the temperature probe was disconnected. Silicone tubing except for exhaust filter and female STT coupling of sampling unit was clamped. All filters and sockets were covered with aluminum foil. Culture flask was allowed to autoclave at 121° C for 20 minutes.
6. pO2 electrode was polarise for 6 hour. pO2 probe was calibrated by aerating with nitrogen
Addition lines were connected to peristaltic pumps
Seed preparation
1. pGLO transformed E.coli was retrieved from the -80°C freezer.
2. E.coli was streak on LB/Amp/Ara plate with inoculating loop.
3. The plate was incubated for 24 hours.
4. Single colony was obtained from LB/Amp/Ara plate and transferred into 100ml LB medium with ampicillin.
5. The flask was placed into the shaking incubator for 24 hours at 32°C.
Experiment No. 2: Equipment, Media and Seed Culture Preparation
Objectives
To describe the steps to prepare a bioreactor
To prepare the media for seed culture and scale-up fermentation
To prepare seed culture for scale-up fermentation
Procedures
Preparation of step up culture
1. LB/Amp/Ara plate was removed from the incubator and viewed under UV light to see the green fluorescence protein E.coli.
2. A single colony was selected from the LB/Amp/Ara streak plate and was inoculated to the culture flask.
3. Culture flask was placed in shaking incubator and incubated at 32°C for 24 hours.
Experiment No. 3: Inoculation, fermentation and monitoring
Objectives
To carry out scale-up fermentation process to increase the yield of desired protein product (Green fluorescent protein in this case)
To monitor cell growth and product formation through manual sampling and computer data logging
Procedures
1. When the medium broth had cooled to below 50ºC, ampicillin was added to a final concentration of 100ug/ml and arabinose was added to a final concentration of 0.2%.
2. The temperature, pH, stirred speed, pO2 set point and airflow were recorded as 32۫C, pH 7.5, stirred speed min 10%, max 90%, 20% pO2 set point and air flow min 25% max 100% respectively.
3. Colonies and cryovial were inoculated from agar plate as there is no growth in the culture flask in day 2.
4. 100ml of seed culture was inoculated into the fermentor.
5. 10 ml of the blank sample was taken out before inoculation and 10ml of the culture was drawn out every one hour for 10 hours.
6. Fermentation broth was harvest and 10ml of the culture was transferred into the test tube.
7. OD reading of the ten cuvette sample that was taken out every hour was recorded.
Experiment No. 4: Isolation and Purification of Product
Objectives
To isolate GFP product
- Using enzyme
- Freezing and thawing
- Sonication
To purify GFP using Gel Permeation Chromatography
Procedures
Isolation
1. 10ml of culture broth in a tube was collected for the rest of the experiments.
2. The cells were centrifuged at 10, 000rpm for 5 minutes.
3. The supernatant was poured into another tube and compared with the pellet by observing them under the UV light to confirm the presence of product.
Method 1: Using Enzymes
1. The pellet was resuspended in 500µl of TE buffer of pH 7.5 using a micropipette till no visible clumps can be seen.
2. 2 drops of lysozyme was added into the resuspended cell pellet using a disposable 1ml plastic pipette.
3. The enzymes were allowed to act for 15 minutes.
Method 2: Freezing and Thawing
1. The tube was placed into liquid nitrogen until the contents are frozen. Then it was thawed in warm water.
2. This cycle of freezing and thawing was repeated for another 2 times to complete the rupturing of the bacteria cell wall.
Method 3: Sonication
1. The tube was placed into a beaker of ice. Sonication was done on ice for 4 cycles of 25 seconds with 10 seconds rest in between each sonication cycles.
2. The contents of the tube were spun in a centrifuge for 20 minutes at 10, 000 rpm after cell disruption.
3. The supernatant was poured into another tube separating it with the pellet.
4. The pellet was resuspended using 400µl of TE buffer.
Purification
1. Eight test tubes and a “blank” were labelled (from “1” to “8”) and placed in a rack.
2. The blank was filled with 2.0ml of ammomium bicarbonate. This test tube was used as a guide to mark the rest of the test tubes with a line at the 2.0ml mark level.
3. The column was carefully drained into a waste beaker until the buffer was just above the top of the gel bed.
4. The cell-free extract was transferred to the top of the gel bad using a disposable plastic pipette. The pipette was swirled around gently at the inside edge of the column, just above the packed matrix.
5. Fractions were prepared by removing the water beaker and placing a test tube under the stopcock. The buffer (eluant) was collected into these test tubes until the 2.0ml mark before moving on to the next tube.
6. Fractions were begun to be taken. The stopcock was opened slowly and allowed the sample to flow completely into the gel bed, collecting the eluting buffer into the first test tube.
7. 50mM ammonium bicarbonate buffer was added carefully onto the top of the column while taking fractions. A 2-3 cm “column” of buffer was maintained on top of the gel column. This is to provide consistent flow of buffer through the chromatography matrix.
8. 2ml fractions were continued to be taken till the 8th tube was filled.
Analysis
Spectrophotometry
1. Some samples were taken from the fractions to take absorbance readings using the spectrophotometer at 476nm. It is the wavelength where GFP strongly absorbs and gives out its usual fluorescence
2. A graph was plotted at OD476 against the fraction number.
Yup thats it!
Looking forward to tomorrow! =)
Haha! Welcome to our photo gallery! Just some random shots of us in action! Enjoy!

Group Huddle! Time to discuss on the approach..

Professor Affendy: You two, look here.. Pay attention..
YT and CK: Yes Professor! *Listens attentively*

Chin Boon in action! Pasting the autoclave tape onto the bottle cap.

NEWSFLASH: Thow has just signed a million dollar endorsement with LB-Broth Inc..

The situation is tense.. any distraction will ruin it..

A moment of chivalry: "Here miss, allow me to turn on the tap for you.."

Another tense, lip-biting moment..

Whirlpool, a new tool for hypnosis.
(Why is everyone so mesmerised??)

Andrew: Why is my darn pen not working?

Teck, 0603's most reliable man, drawing samples.

"Whatcha looking at huh?" - Our very own Choon Kiat as we got caught sneaking up on him =)

Our pride and joy - The GFP are in the cells!

Pippettes, test tubes, cuvettes - Clues tells you that we are in a lab

Deep in thought..

Affendy and Choon Kiat.

Thow, after earning his million dollars endorsing LB-Broth, got himself a babe!
Look how radiant he is! (He probably drinks some of 'em =P)
Green fluorescent protein - Wikipedia, the free encyclopedia
http://en.wikipedia.org/wiki/Green_fluorescent_protein
O. Shimomura
Journal of Microscopy, Volume 217, Issue 1, Page 3-15, Jan 2005
Van Zandt - United States Patent: 4064428
http://patft.uspto.gov/netacgi/nph-Parser?Sect1=PTO1&Sect2=HITOFF&d=PALL&p=1&u=%2Fnetahtml%2FPTO%2Fsrchnum.htm&r=1&f=G&l=50&s1=4064428.PN.&OS=PN/4064428&RS=PN/4064428
Matt BenDaniel - Fireflies
http://starmatt.com/gallery/astro/fireflies.html
Glowing genes: A revolution in biotechnology
http://www.pubmedcentral.nih.gov/articlerender.fcgi?artid=1386127
History and What is GFP
Lim Choon Kiat
Andrew Oh
First Blog Entry
Andrew Oh
Day 1 Blog entry
Jocelyn Chan
Liow Yi Ying
Day 2 Blog entry
Alan Sim
Affendy
Day 3 Blog entry
Chia Cheng Kong
Chua Yiting
Day 4 and Day 5 Blog entry
Andrew Oh
Day 6 Blog entry
Teo Teck Hui
Ong Wen Yi
Learning Points(Final Entry)
Lim Choon Kiat
Graph Analysis
Thow Xin Qiang
Ong Chin Boon
Blog designs
Andrew Oh
Videos
Jocelyn Chan
Liow Yi Ying
Photographers
Teo Teck Hui
Jocelyn Chan
Thank you for visiting! ^^